Showing posts with label how to. Show all posts

Wednesday, 17 December 2014

Review/Tutorial: Get a sparkly make-up look with Kryolan's Glitter Gels

I bought a few glitter gels from Kryolan a little while ago and have only just had a chance to try them out. They are great for creating dramatic fashion looks or for a sparkly party look, so they are really versatile. The particles of glitter are really small and the gel is clear so they are easy to use, they do dry quite fast however!

I had a play around with them and created two looks, one subtle, and one very dramatic.


Subtle:
 
 
To create this look, I used a plum red three quarters of the way across my eye lid. Then I used a dark navy blue and started where the red finishes and blended out towards the outer corner and blended the line between the red and blue, lined the crease and blended. I took the blue under my eye and brought the red down too just from the inner corner. I then applied a dark blue eye pencil in my waterline.

To apply the gold glitter, I squeezed a blob on my hand and used the end of a brush to dab it over my eye lid, and in the inner corner. Be very careful when using it close to the eye! I then applied mascara and its as easy as that!


Dramatic:


To create this look, I used a dark, steel grey and applied it over my eyelid but not taking it past the crease, then with the excess eye shadow on my brush, made the winged shaped, not taking it past where my eye brow finishes. Then I took a fluffy blending brush and blended the lines until there was a graduation of shadow and not a solid line, I then applied the grey under my eye as well. I finished off by using a white pencil in my water line and applied mascara.
I applied the glitter in the same way as before, using the end of a brush to apply it, but this time I graduated the amount. I started from the inner corner of my eye, applying quite a lot and then applied less and less across the eyelid.
 
I think both these looks are ideal for Christmas and New Years Eve parties and the glitter is very effective contrasted with the eye shadow.


For more pictures, visit my facebook page at www.facebook.com/bethhaggarmakeup
 
BethFX


Monday, 24 November 2014

Products to fix dry/damaged hair

Hello all,

Many of us are no strangers to split ends *looks at straighteners accusingly*, and if you are like me and can't live without heat styling tools, then I have a list of products that have definitely improved the look of my hair and it feels much less damaged.

First off, there is no way to fix split ends, you are just going to have to have a trim and then try to prevent them in the future, these products are great at doing that:


Pantene Pro-V Repair and Protect shampoo £3.89 http://www.boots.com/en/Pantene-Repair-Protect-Shampoo-400ml_1330229/
This shampoo has really made a difference to my hair and unlike other brands I have tried, this one has made a noticeable difference, my hair was dull and had no shine whatsoever but now it is shiny and looks healthy. It doesn't smell of anything in particular, just a typical shampoo smell but I don't mind shampoos that aren't fragranced too heavily because anything you use afterwards that has a smell won't be mixed with it.


Schwartzkopf Got 2b Guardian Angel heat protect spray £4.07 http://www.boots.com/en/Schwarzkopf-got2b-Guardian-Angel-220C-Heat-Protection-200ml_1116560/
After washing, follow with this heat protect spray and spray it generously through damp hair. It gives your hair a great shine and as it isn't for use on dry hair you can use a heat styling tool after you have blow dried and it still protects, and up to 220 degrees - perfect for GHDs!


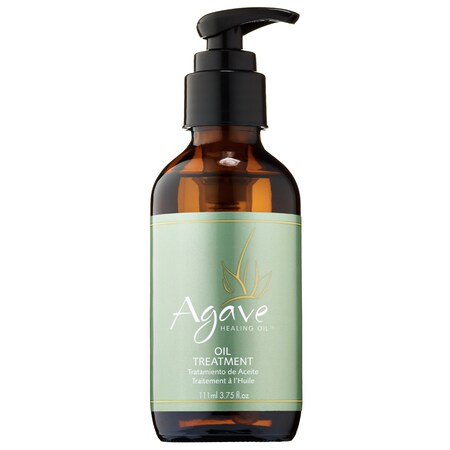
Agave healing oil £16 for 60ml https://birchbox.co.uk/agave-healing-oil-treatment-2194 (this product is a bit pricey but it is a lot cheaper from Birchbox than the official site!)
This is an oil treatment for dry and damaged hair and it works wonders and smells great, warm a small amount in your hands and apply to damp hair, I use it mainly on my ends because those receive the most damage and I have quite oily roots. I tend to use this if I'm letting my hair dry naturally.


Beauty Protector Protect and Detangle leave in conditioner £14 https://birchbox.co.uk/shop/beauty-protector-protect-detangle
This is a really great product, its a leave in conditioner which protects from heat and also helps to detangle your hair among lots of other things! It smells absolutely amazing and it adds a brilliant shine to hair, it comes in a spray bottle to its really easy to apply, again I just use this on my roots as it tends to make my roots quite oily. I will alternate between this and the Got 2b heat protect spray.


I hope these products help you as much as they have helped me!
BethFX

Monday, 12 May 2014

An Announcement!

Hi all,


Haven't posted in a long time and I can only apologise for that, but, I have an announcement to make!

I have started making YouTube videos! I know I'm a make-up artist but I just find make-up tutorials so boring, so my videos are just of me creating various looks sped up, so you can see the process of how I create various make-up (plus, if you asked me to talk to camera, it would be the most awkward thing you would ever see). I have done two so far and I plan to carry on. 

I've put the link to my latest one below, I really hope you like them and please do subscribe! 

See you soon,
Beth x


https://www.youtube.com/watch?v=xzbujub0llQ 

Tuesday, 11 March 2014

How to: smokey eye using eyeliner

Just a quick tutorial for you today on how to create a smokey eye using a pencil eyeliner, handy for when you're in a rush or just need a more subtle look. 


I used a cheap eyeliner because they are easier to smudge due to the fact the pigment is not that good but it gives a nice slate colour which I like. I also used a 'smudger' but a cotton bud would work just as well. 


Step 1: Apply a line of liner on your upper lash line, it doesn't have to be neat.

Step 2: Start smudging along the line.

Step 3: Begin smudging upwards, as far as you like and into your preferred shape, you can keep to your eyelid or you can wing it out. Make sure it doesn't look patchy. 

Step 4: Then use your finger to get rid of any defining lines so it blends out nicely.

Step 5 (optional): Apply your liner in the waterline and on your lower lash line then smudge it to create a smokier look.

Step 6: Apply some mascara then you're done!


Hope this helps some of you! Thanks for reading.

Beth x


Sunday, 5 January 2014

How to: The basics of highlighting and shading

It is very useful to know how to highlight and shade a face correctly. You can enhance certain facial features and hide others, you can also change the look of a person's entire facial structure. 
Now, I have a round shaped face so I like to shade under my cheekbones to give the appearance that I do actually have them and under my jaw. 


  • The key is to shade where shadows naturally fall and highlight where light naturally hits the face.


Here is a picture of where to highlight and shade on the face:


These are the areas that I like to shade and highlight on my face, I hollow out my cheekbones using a dark blush and then use a light pink on the apples of my cheeks. Or if you prefer, you can use a foundation that is two tones darker than your natural shade and use that to shade. Apply it with a foundation brush or your fingers and then blend. To highlight I use a foundation that is two tones lighter. 

Depending on your face shape you may not want to highlight certain areas, for example if you have a prominent chin you may want to shade it instead to make it look less prominent. If you want to make your nose look narrower then you can highlight down the middle and then shade on the sides and vice versa if you want to make your nose look wider. 

I also like to highlight under my eyebrows because I think it really helps to make your eyes stand out and it also helps to define your brow shape. Highlighting your cupid's bow also really helps to define your lip shape. Shading your temples and jaw line can also help to make a round face more structured by making it look more square, however if you have a square face and want to soften it then highlighting your temples and jawline can achieve this.

So you can achieve just about anything with this technique!
Hope this helps you and hoped you enjoyed reading.

Bye for now,
Beth x
facebook.com/bethhaggarmakeup