Sunday, 3 November 2013

A Triumph Stag, a fake arm and lots of blood!

I recently did the make-up for a trailer for a book with a small start up production company called Donroy Films. They make short films and other things and I really love working with them. I've worked with them once before on a project that is still ongoing.

This trailer was for a book called 'Dangerous' and the author wanted a short film-like trailer to go with it. We filmed in various local locations, the production company is self funded so they couldn't travel far to more extravagant locations but the places we did film were just as good. I was the only make-up artist so I was emailed the storyboard and had to work out what make-up people needed for each scene. It involved quite a lot of blood and injuries which is always fun!

Whatever you do as a make-up artist whether it be film, stage etc, you will wait around for long periods of time. There is the initial rush before the scene where you are doing your work and then as soon as its done you'll have to wait for the rest of the team to film the scene which could take hours so I always make sure I bring a book with me (and lots of food!).

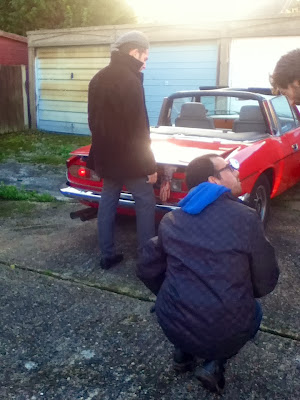
In one scene there needed to be a fake hand hanging out of a car boot, the car was a beautiful Triumph Stag, the hand itself looked pretty rubbish, the skin colour was a bit odd and this made it look really fake. So I used supracolour to darken the skin a bit and shade in the creases on the fingers so the camera would pick it up, I also made the sleeves dirty and added lots of blood. This gave it a more realistic look, we couldn't use a real person's arm as the car's boot was far too small for a person to fit in.

In another scene I had to make someone look dead as they were to be in a morgue and give them a bullet wound on the side of the head. Its hard to make a bullet wound look old as 'fresh' running blood is what makes a bullet wound look good so to a achieve an older look I put the blood on and dabbed it so it looked more like a stain. I think this worked quite well. To make the actor look dead I made his skin pale and shaded under his cheekbones and jaw line, I also gave him dark circles under his eyes and a blue tinge to his lips.

On the last day was the most difficult scene. They wanted to 'shoot' someone and have blood splatter on a wall behind them in one take. I had no idea how to achieve this, but the only way it would've been possible would be to have someone off camera sitting behind the person holding something that could splatter the blood. We came up with different contraptions that could splatter the blood- drain pumps, hoses, hand pumps but none were working the way we wanted. So in the end all we did was use a water bottle! Someone sat behind the actor and as his neck was in shadow I did a quick bullet wound and some running blood so when he was shot and flung his head back into the light you could see it, and the person 'shooting' counted down so they could time it right with the blood splatter. In the end it looked really good and I can't wait to see the final thing! Normal artificial blood is usually thick and gloopy and not very good for squirting as such, so I made my own using corn syrup, water and red food colouring and made it runnier than blood should be so we could squirt it easily. 

These people don't have the highest quality equipment or the easiest locations but they still manage to make amazing, quality stuff and I cannot wait to see the finished trailer. I took a few photos but I'll be sure to get some more stills when the trailer is released. 

Setting up the camera and positioning the fake arm


Testing the camera angle


Old looking bullet wound make-up


Anyway, thank you for reading!
Beth x

Sunday, 15 September 2013

Review: Rimmel Stay Matte Foundation

Rimmel have recently launched a new foundation range called 'Stay Matte'. They describe it as a 'lightweight liquid mousse' and they claim it leaves skin 'shineless' and 'cakeless'. And let me tell you they are not lying! I was really excited to try it as I have been searching for a mattifying foundation for what seems like forever and none of them have lived up to their word. But my search is over! My skin turned instantly matte when I applied it and felt silky smooth.

I was a bit sceptical of the bottle as it is a tube and not a glass bottle with a pump like their other foundations were so I thought it wouldn't last half as long as a glass bottle would. However, there is the same amount in these tubes and a little blob covered half of my face so you really don't have to use much at all.

It is thick in texture but blends flawlessly and doesn't feel heavy at all. You don't have to apply a powder over it however I still do just to set it. It also doesn't feel dry so people with dry skin would be able to use this and also wouldn't have to use powder. For people with oily skin like me it is a dream come true as it just instantly left my skin shine free. 

To apply it I put a small blob on my finger and start on one side of my face and blend it out across my cheek and nose and up to my temple and down to my jawline and chin and then do the same on the other side. I then use a tiny amount for my forehead and nose. A little goes a long way with this foundation so I'm hoping it will last as long as the bottles as they last me a long while. 

I am really happy with this foundation and would recommend it to everyone, I never stay with the same foundation but I think I will stick with this one!


Sunday, 8 September 2013

How to: Terminator inspired special effects make-up

Hi all, I've recently been playing around with using tin foil to look like metal underneath the skin. I tried it on my sister's arm first just to see how it would look and I was very pleased with the outcome! I then tried it on my own face and was also pleased with how this looked! I took inspiration from the Terminator films, it such a classic character and this would be a great look for halloween!
This is how I achieved it...

You will need:
Tin foil
Spirit gum and spirit gum remover
cinewax
Supracolour in red and black and bruise colours
Metal spatula
Artificial blood
Any brush you don't mind getting messy!

For the arm:
I wanted to make it look like there were gashes revealing the metal underneath so first off:

  • I tore pieces of the tin foil into random strips making sure they didn't have any perfect edges.
  • Then apply spirit gum to the edges and stick down where desired. (spirit gum is very, very strong glue so try to use as little as possible)
  • I also applied thin strips of foil on a finger, and also on half of one and added little circles of foil on the back of the hand.
  • Then, roll pieces of wax into sausages and using the spatula apply to the edges of the foil. This is to create the look of skin.
  • I then used a small brush to outline the edges in red and blend it outwards onto the wax using my fingers. Then add some black around the edges to give the effect of burnt skin.
  • I then added quite a lot of dark artificial blood to the foil and basically everywhere on the arm, blood just gives it that gore factor which makes it look more effective and realistic.
Finished look:


For the face:
You'll need the same materials as above. I just covered one half of my face but you can cover whichever areas you prefer. However try to avoid using the spirit gum too close to the eye as the skin is more delicate and more susceptible to damage. 


  • I used larger pieces of foil this time, but not just one large piece as it wouldn't be flexible with the movement of the face and would be uncomfortable. 
  • I first used a skin colour supracolour as a base for a bit more protection against the spirit gum and just applied this with a foundation brush. Then I stuck the foil to my face where I wanted them. As I wanted it to cover my eyebrow I applied a layer of wax over my eyebrow to stop any spirit gum sticking to the hairs as this would hurt a lot to get out!
  • Once all the foil was stuck on and made sure the edges were all stuck down, I outlined the edges in red and black supracolour using a small brush and blended using my fingers.
  • I then used the black supracolour to fill in the eye area to give it more depth.
  • I then applied artificial blood around the edges and over the foil and smeared on the other half of my face to give it a more realistic look.
The finished look:

REMOVING
To remove the foil soak a cotton wool pad in mastix remover (not cotton wool balls as these have too many fibres) and gently rub the edges until they come away and continue to rub underneath so it peels away. Use a cotton bud when removing it from around the eye as the fumes are VERY strong. Then use a make-up wipe to remove the wax, supracolour and blood.

Well that is it! Hope you enjoyed reading this!
See you soon
Beth x

Thursday, 22 August 2013

Before and After make-up and how to hide redness

Hi all,

I wanted to do a before and after make-up post to show how make-up can be used to enhance a person's features and also make their skin look healthier. I used my sister, Ellen for this, she doesn't wear any make-up at all except when she goes out and for special occasions. She has great skin, it isn't oily or has any spots (I'm not so lucky!), however she has a lot of redness. 


Here are the before and after shots...


So to start off, I used MAC's Studio Fix Fluid in NC15 and using a foundation brush (all my brushes I use are Crownbrush) I started on the jawline and worked my up and around her face and adding a bit more to the more red patches. 
Then I used Kryolan's camouflage palette and using a concealer brush applied it under and around the eyes.
Then to contour I used MAC's powder blush in Taupe and using an angled blusher brush, applied this under the cheekbones just to give a bit of structure. You can also apply it under the jawline as well to create more shadow to give the appearance of a stronger jawline.
Then I applied MAC's translucent face powder using a large, soft powder brush.

I then defined her eyebrows using MAC's refill eyeshadow pans in Coquette and Handwritten using an eyeshadow brush.

Then for her eyes I wanted just to define them to make the colour stand out as she has really lovely blue eyes, and to make them appear bigger. For this I used a cake eyeliner by Kryolan and a small liner brush and lined the upper lash line with a small flick. I then used a MAC eye pencil in black to line her water line. I then applied MAC's Zoomlash mascara in black.
Then to finish off I applied a clear gloss to her lips. 

I think this look really suits Ellen as it is not a heavy look, it is simple and pretty. If a person doesn't wear make-up everyday I don't like applying foundation too heavy as it can make them feel uncomfortable. I applied just enough here to give her an even skin tone and just a little contour to give a bit of structure. I love MAC's studio fix fluid as it has a medium coverage and you can build it if you want more. Kryolan's camouflage palette is highly pigmented so this is great at covering imperfections.

I hope you enjoyed reading this and found it helpful!
See you soon,
Beth x

Friday, 26 July 2013

Liquid Latex: how to use and what to use it for

Liquid latex is a great, versatile product. You can create really cool effects with it and make just about anything out of it. However, if you're new to using it, it can be a bit tricky to use. It is available to buy from almost any special effects make up shops, I get mine from Charles Fox. Make sure that it is suitable to be used on the body.

Safety first! 

It contains ammonia so it is very fume-y and smelly, so try not to use it in small, confined areas. 
This is a bit of a given, but do not get it in your eyes!
When applying on the skin, always, always use vaseline underneath it, this provides a barrier between the latex and the skin - more importantly, the hairs on your skin because believe me when I say it will hurt like hell if you try and pull it off and its sticking to your hair. 
When using on the face, be careful when using it around the eyes as your skin is more delicate, so be extra careful when removing it.

How to apply

I like to use wedge make up sponges, they're soft and easy to use and you can cover large areas quickly with them. Liquid latex will ruin anything you apply it with so I just throw the sponge away after I've used it, you don't want to be using your make-up brushes to apply it with as it will just stick to the hairs. If you prefer using brushes you can always buy cheap ones and throw them away afterwards.

I pour how ever much I need in a small bowl and then just use the sponge and start dabbing onto the skin where desired. Make sure to cover the area of skin in vaseline first, not a thick layer as the latex will never dry, just a thin layer is needed. To speed up the drying process you can use a hair dryer. Once it has dried it will go clear, then, if you want it thicker, apply more layers of latex. It will start to dry as a yellow colour the thicker it is.

You can then colour it using supracolour. I find this is the best thing to use as it covers well and is highly pigmented. I use my fingers, brushes and sponges to apply it, depending on what the look is.

Uses

Liquid latex is a great way to create blisters, burns, scars, wrinkles and gashes. Essentially it is like having a second skin. It is also used to create prosthetic appliances such as ears and noses. As I said it is very versatile. It is a lot of fun to play around with and experiment with to see what you can come up with.

Here are some looks I have created with it..

This is a 2nd degree burn effect. Here I have applied a thin layer of liquid latex, used my fingers to pull up parts to create blisters, used my fingers to colour it using a 'burns wheel' which is a set of colours used to create burns, available from Charles Fox and lastly applied some artificial blood. 
(*tip* using a cocktail stick is a great way to pull up parts and create holes.)

 This is a 3rd degree burn look. I used the same techniques as above but more extreme. 

This was inspired by a character from a television show. I used liquid latex to make it look like my skin was splitting. I used the same technique to create blisters but ripped them a bit more so that some bits were hanging off my face. I then used a dark artificial blood to cover them as well as supracolour from the 'burns wheel'.


Removing

If you're using it on more 'hardy' parts of the body such as hands and arms then you can usually peel it straight off. If you're using on the face or if you have more sensitive skin, it is better to use a cloth soaked in warm soapy water, apply this to your skin and gently pull of the latex. I have also found that using facial wipes are quite effective. 
(*tip* if I have any left over in the bowl and it hasn't dried, I pour it back into the bottle. Do not pour it down a sink because it may block it. Wait until it dries and then just peel it out of the bowl and throw it in the bin.)


I hope you enjoyed this and that it is useful to you!
See you soon
Beth x

Links:
Charles Fox: http://www.charlesfox.co.uk/

My website: http://bhaggar94.wix.com/bethfx

Facebook page: https://www.facebook.com/bethhaggarmakeup

Saturday, 22 June 2013

Finishing college and my new website

Hi all,

So I have finished college forever! These past two years have been the best of my life, I've learnt a new skill that I hope to have a career in, I've met amazing people and had so much fun. It was quite sad walking out of the college gates for the last time and very sad saying goodbye to my tutor, but I am looking forward to starting my career.

And this is where my website comes in. Its very basic at the moment and quite empty in content but I hope to be adding more and more to it as time goes on. Its a very small step but everything starts with the first step! So it would mean a lot to me if you would go and check it out, I'll also be making a professional Facebook page and Twitter account which you'll be able to find on there soon.

I'd also like to quickly add that my friend Kirsty has also just made a website and it would be great if you could check her's out too! We hope to work together in the future, and at the moment we will be helping eachother out and trying get work.

Thank you for reading!
~Beth x

Websites:
Mine: http://bhaggar94.wix.com/bethfx
Kirsty's:http://w4lker12.wix.com/makeupcreations

Thursday, 23 May 2013

Match your lipstick with your nails!

I've noticed a trend recently where you match your lipstick to your nail polish, matching colours had gone a bit out of fashion but now its returning and I think this is a really nice subtle way of matching if you don't want to be too obvious about it.

I wanted an excuse to feature my new Miss Sporty nail polish I bought recently and this seemed like a good way! I realised I didn't have a really nice red in my nail polish collection and so I bought a 'lasting colour' Miss Sporty nail polish in the colour 'deep wine' which is a beautiful deep red. It has a shiny finish and is slightly glittery. Its not the in-your-face postbox red, its an elegant, pretty red and goes with any outfit. I love Miss Sporty nail polishes, they are such a bargain but they are such good quality as well. They also have what they call their 'maxi brush' which is an extra large brush so you can cover your nails quickly and easily which I think is a great idea!


This is a really nice colour to match with your lipstick, so I have used a MAC red lipstick in the colour 'Ruby Woo', this leaves a very matt finish so I also used a BYS wet look clear lipgloss over the top to give it a shine. I also used a MAC red lipliner to get a clean line. I prefer using a small lip brush or an eyeliner brush to apply lipstick because I find it is easier to apply and helps achieve a clean, neat line to your lipstick.

Obviously they are not an exact match, it would be very difficult to get an exact match in colour! But I'm very pleased with this look because both the reds compliment each other and I believe this could be worn with any outfit for any occasion. If you're not a fan of bright, bold red lips, you could  try a lip tint with a gloss over the top which give  a more subtle look.


Hope you enjoyed, thanks for reading!
~Beth x

Sunday, 19 May 2013

A bit about me

Hi all,

I've realised that I haven't really put a lot about myself on here, I did a little intro post but I didn't put anything personal. Some people don't like to put too much about themselves on here which is fair enough but I think its nice to know a bit about the person who's blog you're reading, so here goes..

My name is Bethany Haggar and I'm 18 years old. I live in Essex. I support Chelsea. My favourite colour is blue. I have an older sister who also has a blog, I'll link it below. 
I am currently in my last year of college studying to become a make-up artist, I'll finish in June and am waiting for the day where I have a breakdown about what I'm doing with my life, I'm pretty sure it'll happen soon. I met two of my best friends during college and I know that they will be people I will know for the rest of my 
life.


My dream would be to work in the tv/film industry, my goal in life is to touch Benedict Cumberbatch's face. Tv shows and films are a big part of my life and I would love to be part of a team in making one. A few of my favourite shows are: Friends, Supernatural, Sherlock, Doctor Who, Merlin and The Big Bang Theory. I have way too many films that I love to list because I like any genre of film really!


I also love music, its gotten me through some hard moments in my life, especially throughout school. Some of my favourite bands/artists are: Michael Jackson, Muse, Maroon 5, Mumford & Sons, The Hoosiers, FUN., Coldplay, Bastille, The Script, Alanis Morissette, James Morrison, Panic! At the Disco and John Mayer. I'm always finding more and more that I love!


I never thought I would choose to become a make-up artist. I enjoy writing and photography and always thought I'd end up doing something in the journalism area, but I saw my course in my college's book and something just caught my interest. I had no clue about anything to do with make-up, I didn't even wear a lot, so I went along to the open day and I knew this was what I wanted to do. Ever since then I've had a passion for it and I intend to follow it! 

I don't really have any particular hobbies.. I like to draw and paint and take photos. I live right next to a nature reserve and I love taking walks round it, there are some pretty amazing views if you know where to look. I lived in the same house for my whole life so I know the reserve like the back of my hand. A lot of my inspiration comes from the natural landscape, its just so interesting to capture, whether its through photography, drawing or make-up!


My general outlook on life is to live in the moment (however cheesy that may sound) and that everything happens for a reason and everything is connected. I've met two of my best friends from my particular course in my particular college, they've introduced me to people and things that I now love. What if I hadn't chosen to look at any other course other than photography or media? Would I still be the same person I am now? Probably not. And I wouldn't know the people I know now. 
Anyway, getting in a bit deep here, turning into a bit of a spiritual journey of life. So that pretty much sums me up. Hope you enjoyed reading and that you feel you know me a little better :)

~Beth x

My sister's blog: http://www.frecklyfiction.blogspot.co.uk/ - she is an aspiring writer and posts short stories and lifestyle posts, give it a read :D

Friday, 10 May 2013

How to: Two tone eyeshadow

I love creating two toned eyeshadow looks. You can have a lot of fun experimenting with different colours, from nude tones to bright and bold tones. Here is my 'how to' on how to create a two tone eyeshadow look. I hope you enjoy :)


To begin, I selected the colours I wanted to use. I love nude shades of pinks and browns so from my MAC palette I chose: 'Naked Lunch' which is a beautiful nude tone, 'Sweet Lust' which is pretty pink shimmery shadow and 'Satin Taupe' which is a shimmery dark brown. And instead of using an eyeliner on the upper lid, I have used MAC's 'Carbon' eyeshadow which is a smokey, matte black.
 I used three brushes for this look. A small eyeshadow brush, an angled eyeliner brush - both by Crownbrush, and a MAC 286 (duo blending brush) I love the 286 because as it is duo fibre, it doesn't pick up a lot of product when you are blending shadows on the eyes so is great for blending colours together, I love using it to create really subtle looks and also glamorous smokey eyes.I love Crownbrush as well because they are such good value for money and they're brushes are excellent quality.

Crownbrush small eyeshadow brush (left) and MAC 286 (right)

Crownbrush angled eyeliner brush

So, first of all I covered the lid with the two pink tones mixed together. Use the eyeshadow brush to get an even coverage and take it up to the crease and the outer corner of the eye.


_________________________

Then, using the eyeshadow brush again, apply the brown halfway across the lid and take it out to the outer corner of the eye. Make its as strong or as heavy as you prefer. You can wing it out slightly as well like I have done here. Don't take it past the crease at this point.


__________________________


Once you are happy with the brown, take the blending brush and blend the brown into the crease of the eye and out towards the outer corner of the eye as well. Be sure the blend the brown and pink to get rid of the line separating them but not so much that you completely blend the two colours together- you still want to be able to see both colours. I find using circular motions with the blending brush to be a good technique to blend and to avoid patchy-ness. 


________________________

Then bring the brown down underneath the eye using the eyeshadow brush and blend along the lower lashline. This helps to define the eye shape more.


_______________________

With the angled eyeliner brush, apply the black eyeshadow along the upper lashline. This creates more definition and using eyeshadow as a liner is great for daytime looks. If you like heavier liner, use a gel/liquid eyeliner and apply it along the upper lashline and wing it out past the outer corner of the eye. This will also be perfect if you want to make this look more glam for a night out.


________________________


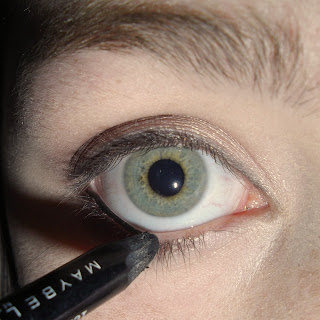
For more definition, use a black kohl eyeliner along the waterline. I have used Maybelline's 'Master Drama' in 'Ultra black'. I am in love with this eye pencil because it is so versatile in its uses and I love an intense black.


_____________________

To finish off, generously apply some mascara to the upper and lower lashes to really make your eyes pop. I've used MAC's 'zoom lash' in black. I really like this mascara, it works really well for me as my lashes are short as well as straight (worst combo!) and it adds volume as well as length. 


_____________________


The finished look!


Thank you so much for reading and hope you enjoyed it! 
~Beth x


Sunday, 5 May 2013

Review: Swap your MAC for Maybelline!

I've been using Maybelline's Master Drama kohl eyeliner recently and I have got to say it is the best pencil eyeliner I have ever used. I like my eyeliners to be intensely black and this one is in the colour 'Ultra black' and the name definitely doesn't lie. It also claims to stay on for 16 hours, I wore it for about 12 (16 hours is a long day!) and it didn't need topping up at all. It is really soft so glides on effortlessly and is great to smudge to get a smokey look, however it is quite easy to get your hands in a bit of a mess when handling it! The best thing though is the price, £4.49!

Maybelline Master Drama in Ultra Black


Now MAC's eye kohl is fine... but that's all it is. Fine. It doesn't wow me. It doesn't have an intense colour and I've found that when I wear in the waterline, it smudges off really easily which isn't good if you have particularly watery eyes or in the winter where the cold air and winds make your eyes stream. I have nothing against MAC products, I use them daily at college but I think you can get products that work just as well for a lot less money. This eyeliner costs £14.00 which in my eyes is ridiculous! I have also found that it is quite dry and hard and so is great for getting a sharp line, I often use it more than gel to get a sharp finish, but is very hard to smudge if you want more of a smokey look. 

MAC Eye Kohl in Smolder
(yellow dot is so I know its mine when I use it at college)

Thanks for reading!
Beth

All opinions are my own. All photos taken by myself.

Thursday, 25 April 2013

Creating a music video: Arts Award project for college

Hi there,

For college, we had to do something creative for a qualification called 'Arts Award'. We had to organise and create something, it could be anything we liked, an event such as a photoshoot etc. It had to either show that we had practised skills we already had or tried something new. Me and my friend Kirsty decided to try something new! So we teamed up and came up with the idea to create a music video. Neither of us had a clue about filming but we were both pretty good at photography. We both like a band called 'Dive Bella Dive' (now called 'The Dive'), they are quite alternative and they have a song called 'Animal'. We didn't want a high profile song, nor did we want a complicated song with a deep story behind it as this would limit our ideas of what we could do for the video. 'Animal' is a really catchy, fun song so we decided to use it.

We did originally have another idea for it but we needed people to help us film, edit and we needed a place to do it. We didn't want to keep waiting on people to get back to us so we scrapped the idea and came up with the idea to make a lyric video! This we could easily do ourselves without having to rely on anyone and we could also edit it without any help. We would take individual photos of people holding up the signs and then put them together with the music.


We wrote the lyrics on pieces of A4 card, this took a couple of days between us. We then contacted a few friends asking them if they could help out and be in the video and we arranged times and dates. We decided to take the photos at random places around London. We planned to have more people in the video but it only ended up being myself, kirsty and another friend as no one else could make it. As the song is called 'Animal' we brought knitted animal hats to wear and some cuddly animal toys to hold in the photos.

It was a really fun day in London, and it took a good day to take all the photos. I love London and although its quite tiring travelling all over it I never want to leave! But we managed to get all the photos done, and got a few strange looks as well! It made us realise how much organisation is needed for such a small project, but it did help on the day because we could get through the pieces of card quite quickly. 


I really enjoyed the experience and we were so pleased with the result. We've had so many good comments about it and the band even said they loved it so its definitely an accomplishment!

I'll link the video below, please give it a watch and we would really appreciate it if you shared it if you like it! Thank you :)
- Beth


Friday, 12 April 2013

Hello

Hello, my name is Beth and I'm a recently qualified make-up artist, I did have a blog which I co-wrote with a friend but we decided that it would be better for us to get rid of it as we were neglecting it due to a lot of college work taking up most of our time. So I have decided to start a whole new blog in which I will post make-up tutorials, reviews, and also about my general life.

 I will try my best to make it as interesting as I can and if you would like me to do a particular tutorial or review of anything, please just let me know. On my previous blog I usually wrote about make-up products that were value for money and affordable so I will carry on with that, I think that you should still be able to achieve the look you want without having to pay out a fortune. I also love the special effects side of make-up, blood and gore, that sort of thing, so you will probably see a lot of that on here. Apologies if you are squeamish! 

So as this is my first post I'll put some pictures of my work on here and you can have a look :)
See you soon
Beth (you can contact me on twitter if you like: BHaggar)